Hardware Parts list
Minimum parts
These are the things that you will need at a bare minimum to create an arcade like cabinet that allows you to control the iPad.
Plywood- I used 1/4th inch thick 2 ft by 1 ft slabs that I bought at Michael’s for 4.99 a piece. I used 6 pieces of plywood, but you could just by a large piece of plywood at a hardware store and cut it to size. 30$ MAX
Hinges and screws- I used brass inch-long cabinet hinges and the screws that came with them. About $2.50
Additional screws $2.00 a pack (you’ll only need a pack)
Plumbers clamps- The kind that when you turn a flat-head screw that is attached to the clamp, the clamp tightens or loosens. About 4 $.
Wii fightstick- It must connect to the Wii remote, but anything that connects to the Wii remote would work. In my case, I used the Hori fightstick because of the square gate, eight buttons, turbo, etc. You can use whatever you want. 40$ but can be had cheaper.
iPad- a little redundant but worth listing anyway 500$
Wii Remote- necessary to connect to the ipad 40$
Velcro- To secure things inside while ensuring that they are reusable in other projects.
Optional parts
Each of these things represents a feature or set of features that can be introduced to your iPad arcade machine. Feel free to omit anything in this list that you don’t feel you can afford or would want in your machine.
iPad dock- This allows charging, easy audio-out, and easy docking. You don’t have to use the iPad dock at all, because you can simply use the charge cable that came with the iPad and connect the speaker wire directly to the head-phone jack. 30$
AVI-out cable- This is a prerequisite to the pico-projector. If you want video on the pico-projector, you have to hook it up somehow. This also allows you to hook up the arcade machine to a TV or other video display. Some of these come with an additional USB chord as well as the audio and video chords. In this case you can use those AVI cables to charge the iPad as well. If you are using a pico-projector the AVI cables will also allow you to patch the audio of the iPad through the pico-projector and into the speakers. 30$
Pico-projector- I would suggest using the brightest that you can find. I use the Optima PK301 and that ran me about $300 dollars. There may be some smaller sized regular projectors that will fit as well, but you would have to install some fans for proper ventilation. This is really what sets this iPad arcade apart from the others. Plus the pico-projector will be removable when you are done.
Speakers- Make loud sounds. Speakers will greatly enhance the use of the projector because the projector’s onboard speaker is tiny. Not a prerequisite of a projector, but recommended as a basic feature of the iPad arcade because of their low-cost and ease of installation. It’s so cheap and easy, why not do it if you are going to take the trouble to build an iPad arcade, anyway? The Speakers are non removable when you are done. 10$
Cabinet Feet- Without these you will have a hard time getting your arcade machine to sit steady and not wobble. 3$
Software
For the Ipad
This is a list of the software you will need on the iPad.
JailBreak- There are 2 way to go about this now. When I was first building it there was only one. I used the Spirit Jailbreak. You can use whatever you are most comfortable with. For a full walkthrough on how to jailbreak your iPad click
here FREE
PSX4ALL- available through the Cydia store once you jailbreak. You may need to add a repository to see it though. Click
here for tutorials on adding sources. Once you have it keep in mind that it only loads psx ISO’s they will come in the form of a .iso file or a .bin and .cue file. 4$
DiplayOut- For mirroring the iPad display onto a tv or the projector. You will not be able to display gameplay without this program. The repository for this should be available by default. 2$
OpenSSH- For getting roms onto the iPad Learn how to install and use it
here(The built in downloader in PSX4ALL can be problematic sometimes)FREE
Playstation bios file- required for PSX4ALL to run games. I can’t legally link to it but, Google is your friend...
Legal Roms- Google it. I will not answer anyone asking where to get roms.
For your Computer
This is a list of software you need on your computer to move roms to the iPad
WinSCP- If you have windows this is the simplest method though it is very very slow. Best to transfer files overnight. It supports multiple consecutive file transfers though. Can be had at their website
here. FREE
Tools List
Circular Saw -For the straight cuts.
Router - No not the networking equipment. You need this to shape the top panel and to make a hole for the projector. These can be as cheap as 25$ ( Caught mine in sale)
Drill- For pilot holes Absolutely necessary if you want a stable box.
Sandpaper
Pant
De-soldering Braid- to get the arcade stick out of it’s casing
Solder- to put the arcade stick back together
Flux- For good solder joints
Soldering Iron
Screwdriver
Metal File - for bits of screw that inevitably stick out
Dremel- for cutting out part of the plastic fightstick.
Clamps- for holding the wood while you work with it.
Step One: Cutting the boards.
Start of with 6 pieces of 1foot by 2foot plywood of any thickness. I used 1/4th inch thick craftboard. Cut them out of plywood if you want to save some money on wood.
Step Two: Disassemble the arcade stick.
Disassemble the Arcade stick by removing all of the screws you can find.(make sure to keep up with them)
Remove the small c shaped metal clamp from the bottom of the arcade stick to remove the stick from it’s enclosure. The c shaped clamp holds all the parts of the stick together so be careful.. as soon as you manage to get it off a spring will try to make everything jump apart. Make sure you don’t lose it.
De-soldier the large buttons on the back. (The ones with white arrows pointed at them) This will allow you to remove the circuit board and get to the plastic tabs that keep the buttons in place.
Remove the buttons by pressing on the tabs on both sides of the button and pressing it out through the front. be careful not to push the tabs too far or they will break. After you remove the buttons and stick carefully remove the adhesive sticker over the front and set it aside for later. Remove the screws holding the metal plate in place. And set them and the metal plate aside for later. Finally you need to use a dremel to carefully cut out the protruding piece of plastic that holds the turbo toggles, home, select and start buttons.
Step Three: The Bottom and Hinged Lid
Cut one board in half this will be the lid and bottom.
Take both halves of the board you just cut and remove 1/2 inch from any side. We are removing half an inch to fit it inside the perimeter of the finished box. Set aside one for more work later
Step Four: The Sides
This can be modified to taste. Here is how I built mine.
Take two uncut pieces and make a perpendicular cut in the center of the 2foot long side about 4 inches into the board. It dosn’t matter if you get this perfect but do get both boards exactly the same as each other. This is easy if you use clamps and cut both at the same time.
Measure from either corner on the opposite side of the cut and make a mark 3 inches from the corner on the short side. (Wherever you make the mark is now the top of the side)
Cut from your mark to the end of the 4 inch cut you made earlier. (Save the scraps for later) Your sides are now done.
Step Five: The Top
Cut a 3 inch by 1 foot strip from the bottom of one of your scraps. You should be able to do this in one cut.
Step Six: The Front
Cut another uncut board in half. Take a small piece of scrap an attach it to the board so that it creates a parallel ledge 1/4 inch below the top edge of the board The side you can see the scrap from is the inside when you assemble the box.
Step Seven: The Lid
I’d like to take a moment to remind you to measure carefully
We are cutting the holes for the arcade stick but remember everything will still be in the same relative place when we are done so the spacing between buttons and the stick will always be the same.
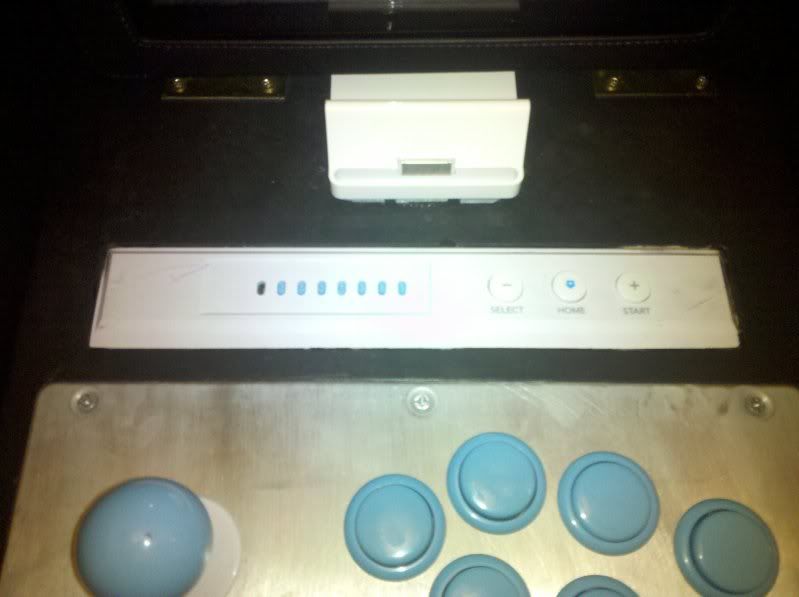
Use the router to take out bits of wood so that your arcade stick can be attached. You will need to remove a space large enough for all of the buttons to fit through as this picture shows. Use the metal plate as a guide to help you know where you need to route. You don’t need to worry about the circuit board as the buttons are long enough to give it clearance. You also need to create a ledge that will hold the turbo toggles, start select, and home buttons. To do this just route out a rectangle the size of the entire grouping halfway through the wood on the top side. Then come in about an inch on either end and route out through the rest of the wood in this smaller rectangle. Make sure to align the hole with the circuit board. Next you need to route out a spot for the stick to be secured in. On the bottom of the board route about 3/4ths of the way through the wood because this will be reinforced by a metal plate later. Route out a space slightly larger than the base that holds the stick to allow room for wires and adjusting. Go all of the way through the wood directly over the stick to create a hole for the stick itself. The hole can be slightly larger than the hole in the metal plate that comes from the arcade stick. Finally route our spaces on bottom for the wires to run so the solder joints aren’t stressed later. Drill pilot holes for the screws to hold the metal plate and screw it into place. Find the adhesive layer you removed and set aside earlier. Cut out around the buttons in the shape of the hole you made for them to go through and place the cutout under the metal plate so that it lines up with the button holes. This makes the buttons tight and not wiggle when you play. Replace the buttons into the metal plate. Replace the circuit board and solder the buttons back again. Place the base of the joystick on the bottom of the lid making sure you have it aligned right and it is facing correctly. (to check facing just make sure the length of the wires makes sense. Some are longer than the others the longest should be on your left if facing the top of the board, right when you are looking from the bottom) Cut your plumbing clamps in half and drill holes in each piece. Screw these into the board on either side of the base and tighten them over the base to clamp it to the lid. If it’s aligned wrong just loosen the clamp and adjust then tighten again. Reinsert the joystick. Push the turbo bank into place. When you are done it will look like this.


Step Eight: The Shelf
Take the other half of wood left over from cutting the front and cut it in half. Remove 1/2 inch from one of the short sides. This will be the shelf that holds the projector.
Step Nine: The Back
Cut a hole in the just above center of the uncut piece of wood you have left. It should be wide enough to accommodate the both the ipad charge cable and an audio cable as they are spaced in the back of the ipad dock. Cut two slits into the wood towards the top if you have a zoogue case and want to support landscape mode. You will also need a hole for the projector but it’s placement will depend on where you put your shelf and the type of projector you have.
Step Ten: The Box
Sand and paint all of the wood you have cut so far. Assemble all of the pieces. You can hold them all together with clamps and drill pilot holes and then screws. The shelf will be the only part that changes. Just make sure it is placed high enough to give your speakers clearance. The front is assembled with the ledge on the inside and the front and back overlap the sides so they are flush. (Thats why we cut half an inch off of the other pieces so they would fit flush on the inside with a minimal amount of cutting) The Lid goes level with the ground. Make sure the hinges face up.
Step Eleven: The Guts
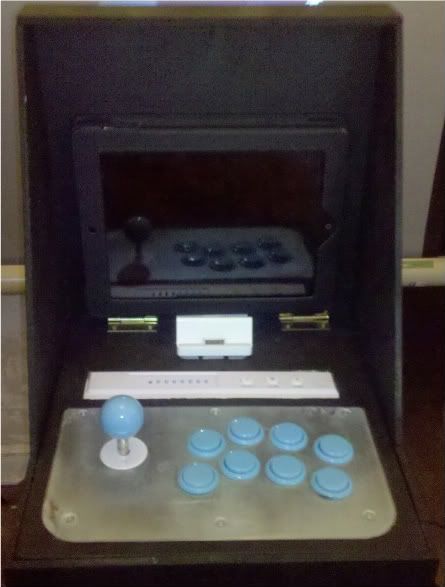
Put velcro on the bottom of your speakers, ipad dock, and projector. It will hold them in place. The easiest way to go about this step is to remove the cover from the adhesive and place it in the box with both parts of the velcro attached to the object being placed. That way when you set it down the velcro sticks. The speakers go below the shelf and the projector goes on it. The dock goes on top of the lid. Connect it all together and you are finished. It should look something like this.
Thanks to
http://pineconeattack.com for the guide I used to take apart my fightstick and some of the pictures on this walkthrough. My wife for letting me do all this for weeks. Also props to my buddy Courtney for helping assemble it.